
The work stability of machines is closely related to correct operation and maintenance. The following is an introduction of the methods to daily maintain laser cutters.
Water change and water tank cleaning (weekly water tank cleaning and circulatory water change are advised)
Note: assure the laser diode is full of circulatory water before working.
The quality of circulatory water will directly influence the service life of laser diode. Purified water is advised and the water temperature should be kept under 35℃. If the water temperature is higher than 35℃, the water should be replaced or the temperature should be decreased by adding ice blocks (chiller or two water tanks are advised).
Water tank cleaning: first, turn off power supply and disconnect the water-in pipe from the infall, thus let the water in the laser diode flow automatically into water tank. Open the water tank and take out the water pump to clean it. After cleaning the water tank and change the circulatory water, return back the water pumps and connect the water pipe connected with water pump to the infall. Coordinate the connectors. Electrify the water pump separately and start it for 2-3 minutes (to fulfill the laser diode with circulatory water)
Air machine cleaning
Long-time use of air machine will cause solid dust accumulation in the air machine to generate strong noise and degrade the air emission and odor elimination. When the air suction is weak and the smoke emission is not smooth, turn off the power supply first and then disassemble the air intake vent and air outlet pipe to clean the dust. Then place the air machine up-side-down and move the fan blades until cleaning finished. At last, assemble the air machine.
Lens cleaning (Daily cleaning before work is advised. When cleaning, the machine should be turned off.)
In the above introduction herein, it had been explained that there are 3 reflecting mirrors and 1 focusing mirror (#1 reflecting mirror is at the light outlet portal of the laser diode, i.e., the top left corner of the machine, #2 reflecting mirror is at the left end of the beam, #3 reflecting mirror is at the top part of fixed part of the laser head, and the focusing mirror is in the adjustable drawtube below the laser head.). The laser beam is given out from the laser head through being reflected and focused by these reflecting mirrors and focusing mirrors. Lenses are liable to pollution of dirt or other pollutants to cause laser loss or lens breakage. Instead of being disassembled, #1 and #2 mirrors should be cleaned by wiping them with lens wipe paper dipped in leaner from the centre point to the its edge in ring shape. #3 mirror and focusing mirror should be disassembled from the mirror frame and wipe in the same way. After cleaning, assemble it back as before.
Note: ①the lens should be wiped slightly to avoid damage to its surface film; ② be careful to take and put the lens to avoid falling off; ③ when fix the focusing lens be aware to keep the concave down.
Lead rail cleaning (Cleaning every half month is advised. Operate after turning off the machine.)
Lead rail and straight line axis are essential parts of the equipment and their functions are guiding and support. To guarantee high precision of processing, the lead rail and straight line have high guiding precision and good stability. When running, a mass of caustic dust and smoke generated in processing will accumulate on the surface of lead rail and straight line. Long period of accumulation will influence the processing precision seriously, form pitting on the surface of the lead rail axis and shorten its service life.
Note: preparation to clean lead rail – dry cotton and lubricant
The lead rails of engravers are classified into straight line lead rail and roller lead rail. In YM series, straight line lead rail is adopted for X axis and roller lead rail is adopted for Y axis.
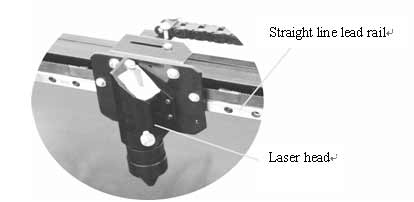
|
Laser head |
|
Straight line lead rail |
Clean the straight line lead rail: first, move the laser head to the most right end (or left) and then find the straight line as indicated in the above illustration. Wipe it with dry cotton until it shines and then lay on some lubricant (sewing machine oil can be adopted; engine oil should never be used.), push the laser head to its left and right for several times separately to make the lubricant uniformly distributed.
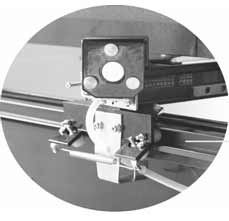
Clean the roller lead rail: move the beam to the inner side and open the end lids on both sides to find the lead rail as indicated in this picture. Wipe the connection place between the lead rails at both sides and the roller, and then move the beam to clean other places.
 Hoop guide rail
Tightening the screws and the coupling
After the motion system work for a while, the screws and couplings at the connection place will loosen. This will influence the stability of the machine. Thus it is necessary to observe whether there is any abnormal noise or abnormity with the transmission parts and any problems found should be resolved to tighten and maintain the machine. At the same time, the screws should be tightened one by one periodically. The first time tightening should be executed after about one month use.
Checking of light route
The light route system of the laser engraver consists of reflecting by the reflecting mirrors and focusing by focusing lens. In light route, there is no deviation of focusing lens. However, the three reflecting mirrors are fixed by mechanical parts and have higher possibility of deviation. Checking whether the light route is normal every time before working is advised though deviation doesn’t occur under normal circumstances.

